Key Takeaways
- Precision is Paramount: A detailed suit measuring chart is your personal blueprint for a perfect fit, moving beyond generic off-the-rack sizes which are based on outdated averages.
- Go Beyond the Basics: Critical measurements like shoulder width, sleeve inseam, and crotch depth are what separate a good suit from a great one. Don't just focus on chest and waist.
- Measure Correctly: Use a soft tailor's tape on your body (not over bulky clothes), stand naturally without tensing, and ensure the tape is level. Accuracy here prevents costly alterations later.
- Understand Standard Sizing Flaws: Off-the-rack suits use a fixed 'drop' (typically 6 inches between chest and waist size) which fails to accommodate many body types, making personalised measurements essential.
The path to a suit that feels like it was made just for you doesn't start with flipping through fabric swatches. It begins with something far more fundamental: a suit measuring chart. Think of this as your personal blueprint, a detailed map of your body’s unique landscape that a tailor uses to craft a garment that fits you and you alone. It’s the essential first step when moving away from the generic world of off-the-rack sizes.
Your Blueprint for a Flawlessly Tailored Suit
Achieving a flawless silhouette has less to do with fleeting fashion trends and more to do with the precise, time-honoured art of measurement. An off-the-rack suit is built for an 'average' person—a statistical model that almost never matches a real, living individual. This is exactly why a standard 42R jacket might feel tight across the shoulders yet billow around your waist. A proper measuring chart gets rid of all that guesswork.
For your tailor, this chart is the definitive guide, translating your physical form into a series of actionable numbers. These figures will dictate every single detail of the suit's construction, from the width of the lapels right down to the break of the trousers. Understanding this process gives you a real appreciation for the craftsmanship involved and helps you communicate your own preferences much more clearly.
Beyond the Basics of Chest and Waist
Sure, chest and waist measurements are the foundation, but a master tailor works with a much deeper set of data points to achieve that truly superior fit. It's these nuanced measurements that separate a good suit from a great one.
Here are just a few of the critical measurements that standard charts often miss, but that we never overlook:
- Shoulder Width: This is the bedrock of the jacket's structure, defining how it drapes across your back. Getting the shoulder measurement wrong is one of the hardest and most expensive alterations to fix later on.
- Sleeve Inseam: Measured from the armpit down to the wrist, this ensures your sleeve length is spot-on without ever feeling like it's restricting your movement.
- Jacket Length: This is all about balance. A jacket that's even slightly too long or too short can completely throw off your body's proportions and ruin the silhouette.
- Crotch Depth (Rise): A crucial measurement for the comfort and fit of your trousers. It's the difference between trousers that are uncomfortably tight or unflatteringly saggy.
The Foundation of a Bespoke Experience
Ultimately, starting with a comprehensive suit measuring chart is the first real step toward a garment that feels less like clothing and more like a second skin. It’s the guarantee that the final product will deliver not just undeniable style, but exceptional comfort and freedom of movement.
This is what it's all about: the difference between simply wearing a suit and owning one that is an extension of you. This painstaking attention to detail is the very hallmark of the entire made-to-measure process, where every line and seam is crafted with your specific form in mind from the very beginning.
Getting The Basics Right For a Perfect Fit
If you're short on time, think of this as your essential checklist before diving in. Getting these fundamentals right from the start is the key to understanding what separates a truly bespoke suit from a standard off-the-rack garment.
A perfectly fitting suit is built on precise data, not guesswork. Taking the time to measure correctly is the single most important investment you can make in the final garment.
Here are the critical points to keep in mind:
- Your Numbers Are All That Matter: Forget standard sizes. They're based on statistical averages that almost never match an individual's unique proportions. This is exactly why a detailed suit measuring chart is indispensable; it’s about your body, not a generic model.
- The Right Tool for the Job: You don't need a whole tailor's workshop. A simple, flexible tailor’s tape measure is your most important piece of kit. It’s designed to wrap around the body’s contours, which a rigid builder's tape simply can't do accurately.
- The Foundational Measurements: Start by focusing on the core trio: the chest, waist, and inside leg. These numbers form the foundation of your suit's fit. However, it's the finer details, like shoulder width and sleeve length, that truly shape the silhouette and create that sharp, custom-made look.
- The Value of a Professional Eye: While measuring yourself is a fantastic starting point, the expertise of a professional tailor is irreplaceable. A tailor doesn't just read the numbers; they interpret them, taking into account subtleties like your posture and natural stance, which a tape measure alone can't capture.
How to Use a Suit Measuring Chart Accurately
Alright, let's move from theory to practice. A suit measuring chart is only as good as the numbers you put on it, and when it comes to tailoring, precision is everything. This breakdown will walk you through each critical measurement, explaining not just how to take it, but why it’s so important for the final fit.
Grab a soft measuring tape, and let's turn a seemingly complex task into a simple, manageable process.
Before you start, a couple of golden rules. Stand naturally—no puffing out your chest or sucking in your stomach. The tape should be snug against your body, but never tight enough to leave a mark. Think firm, but gentle.
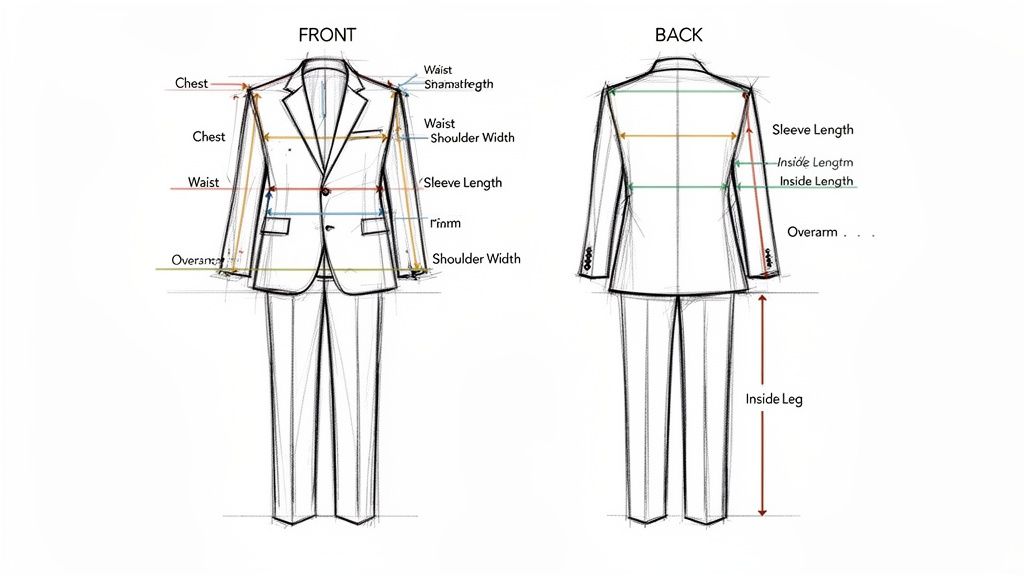
Nailing the Jacket Measurements
The jacket is the architectural heart of your suit; its measurements define your entire silhouette. Get these right, and everything else falls into place, creating a look that is both sharp and comfortable.
Here are the essential points to capture:
- Chest Circumference: This is the foundation. Wrap the tape around the fullest part of your chest, usually just under your armpits. Make sure the tape is level all the way around your back and isn't drooping. A tailor adds 'ease' to this number for movement, so an exact body measurement is vital.
- Shoulder Width: This is a make-or-break measurement that’s very difficult to alter later on. Measure from the bony point of one shoulder (the acromion), across your back, to the bony point of the other. It's key to follow the natural curve of your upper back here.
- Jacket Waist: Don't confuse this with your trouser waist. Find the narrowest part of your torso, typically just above your belly button, and measure the circumference there. This number is crucial for shaping the jacket and avoiding that dreaded boxy look.
- Overarm Measurement: Here's a pro tip often missed on standard charts. Take this measurement just like the chest circumference, but with your arms down by your sides. Wrap the tape around your chest and your arms. This gives your tailor a clear picture of how much room you need for a comfortable fit, especially if you have a broader back or muscular build.
Mastering the Trouser Measurements
Well-fitting trousers are the difference between looking sharp and looking sloppy. They need to be comfortable whether you're standing, sitting, or walking, and the secret is in these specific measurements.
Follow these steps for accurate trouser figures:
- Trouser Waist: Measure around where your trousers will naturally sit. This is typically on or slightly below your navel. Whatever you do, don't just use your jeans size—formal trousers fit very differently.
- Hips/Seat: This is the widest part of your lower body. Wrap the tape measure around the fullest part of your hips and buttocks, keeping it completely level.
- Inside Leg (Inseam): Stand with your feet slightly apart. Measure from the highest point of your inner thigh right down to where you want the trousers to end. A great tip is to wear your dress shoes while doing this to get the length perfect.
- Outside Leg (Outseam): Measure from the top of where your waistband will sit, down the outside of your leg, to the same endpoint you used for the inside leg.
This whole process—from taking the initial measurements to finalising things with your tailor—is what guarantees a perfect fit.
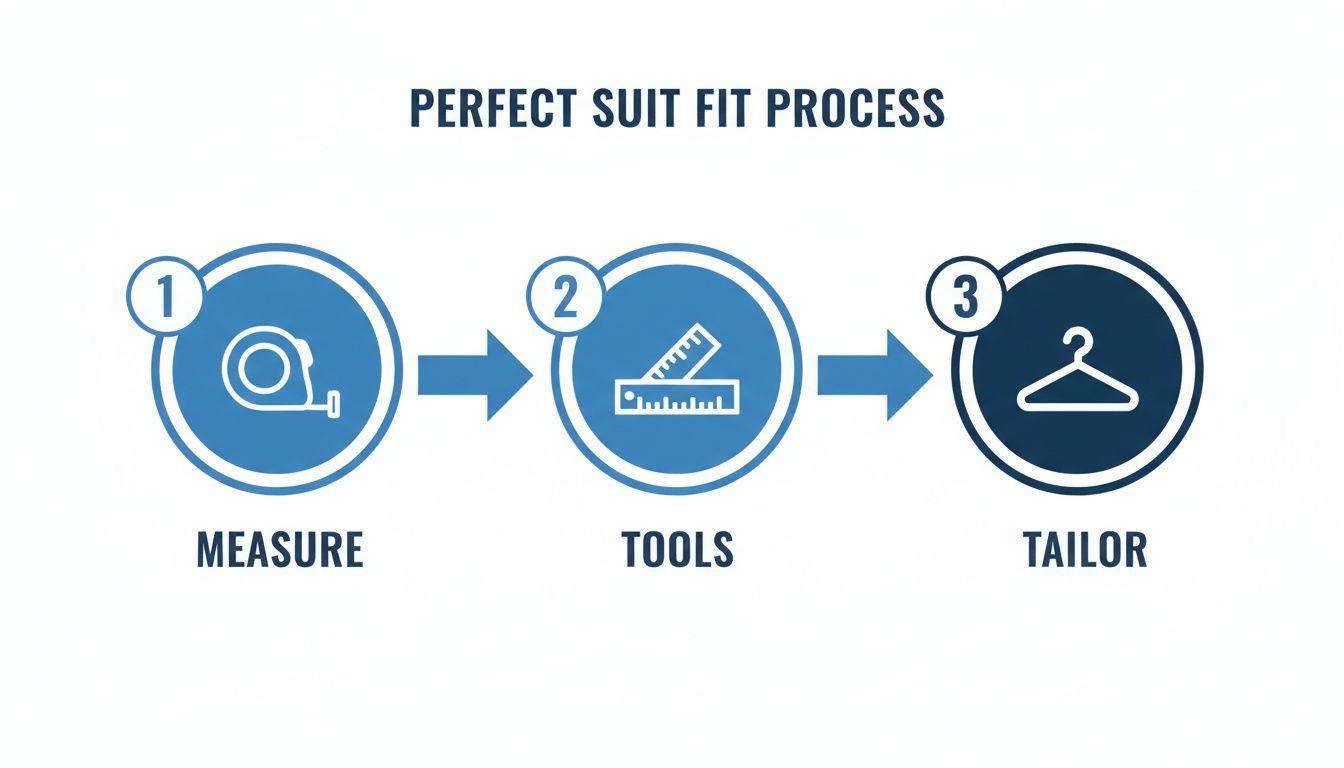
As the infographic shows, accurate self-measurement is the critical first step. It empowers you with the foundational data for a great fit before any tools are used or a tailor gets involved.
Final Checks for Length and Balance
Beyond circumference, the length measurements are what bring balance and proportion to your suit, ensuring the final garment complements your height and build perfectly.
- Sleeve Length: Let your arm hang naturally at your side. Measure from the same shoulder point you used for the shoulder width, down the outside of your arm, to about one centimetre past your wrist bone.
- Jacket Length: This comes down to both proportion and personal style. For a classic look, measure from the base of the back of your neck (where the collar sits) down to the point where your fingertips end when your arm is relaxed at your side.
By carefully taking each of these measurements and jotting them down on your suit measuring chart, you’re giving your tailor the precise data they need to craft a suit that is uniquely yours. It’s a small investment of time that pays massive dividends in the end.
Our Printable Suit Measurement Checklist
To make things even easier, we've created a simple checklist you can print out and use. Just fill in the blanks as you go.
| Measurement Area | Your Measurement (inches/cm) | Quick Tip |
|---|---|---|
| Jacket | ||
| Chest Circumference | Measure at the fullest part, under the armpits. | |
| Shoulder Width | Go from the bony point of one shoulder to the other. | |
| Jacket Waist | Measure at the narrowest part of your torso. | |
| Overarm | Measure around the chest and arms together. | |
| Sleeve Length | Measure from shoulder point to 1cm past the wrist bone. | |
| Jacket Length | Measure from base of neck to your fingertips. | |
| Trousers | ||
| Trouser Waist | Measure where your trousers will naturally sit. | |
| Hips/Seat | Measure around the fullest part of your hips/buttocks. | |
| Inside Leg (Inseam) | Measure from crotch to desired trouser hem. | |
| Outside Leg (Outseam) | Measure from waistband to the same hem point. |
With this chart filled out, you're armed with all the essential information for your tailor.
Why Off-the-Rack Often Fails: A Look at Changing Body Shapes
Ever wondered why a standard size just doesn't seem to fit right? Personalised measurements are more critical than ever because the modern man’s body shape has changed dramatically. Most standardised charts are based on outdated data that simply doesn't reflect today's population.
The Size UK survey of 2004, led by UCL researchers, was the first comprehensive 3D body scan of Brits since 1951. It revealed that men's average chest circumference had grown by 5.5 inches to 41 inches, and waists had expanded by 3.8 inches to 36 inches.
This was a monumental shift. It meant that traditional UK size 38 chest charts, which fit 55% of men in 1951, now fit only 28%. This forced tailors to expand their ranges significantly and is a key reason why a generic suit measuring chart often fails, leading to a 40% rise in alteration demands after 2004.
For a deeper dive, check out our guide on how to measure yourself for a suit, which offers even more detailed tips and visual aids to help you perfect the process.
Why Standard Suit Size Charts Often Fail
Ever grabbed a suit off the rack, seen your usual size on the label, and then wondered in the changing room why it’s pulling across the shoulders but feels baggy at the waist? You’re not alone. This frustrating experience comes down to a simple truth: standard suit size charts are built on outdated averages and mass-production compromises, making them inherently flawed for the individual.
The whole concept of standardised sizing is a historical relic. It wasn’t born from a desire for a perfect fit, but from the brutal necessity of mass production. Early ready-to-wear charts were often pieced together from military uniform data and limited population surveys, creating a one-size-fits-few model that, surprisingly, still shapes how clothes are made today. This system forces your unique body shape into a predefined box it was never meant for.
The Problem with Averages
The core issue is that off-the-rack suits are designed for a statistically "average" man—a theoretical figure who rarely exists in the real world. This is where the concept of the ‘drop’ comes into play. The drop is the standard difference between a jacket's chest size and the trousers' waist size, almost always fixed at six inches. A 40R jacket, for example, will invariably be paired with 34-inch trousers.
This rigid ratio immediately fails anyone who doesn't fit the mould.
- Athletic Builds: If you have broad shoulders and a narrow waist, a standard drop suit will leave you with a jacket that fits your chest but trousers that are swimming on you.
- Larger Frames: On the flip side, a man with a broader waist relative to his chest will find the jacket fits but the trousers are uncomfortably tight.
The system assumes a proportional uniformity across the population that simply isn't there. This is precisely why a personalised suit measuring chart is so vital for getting a truly comfortable and flattering fit. It throws out the flawed average in favour of your actual, individual proportions—a central idea in the made-to-measure vs bespoke debate.
A History of Inaccuracy
Looking back at where these charts came from reveals just how limited they are. In the late 19th century, the UK’s booming ready-to-wear industry, fuelled by post-Crimean War economic growth, needed a quick way to produce suits for a rising middle class. British manufacturers made the chest measurement the cornerstone of their sizing, typically ranging from 34 to 44 inches.
By 1890, with over 70% of London's white-collar workers needing affordable suits, these charts were factory essentials. The catch? They were based on averages from a survey of just 5,000 men in Manchester, completely ignoring 15-20% of body type variations. This led to return rates as high as 25% in early department stores.
The Modern Maze of Vanity Sizing
Compounding these historical flaws is a more recent, and frankly deceptive, practice: vanity sizing. To flatter customers and encourage sales, many brands deliberately mislabel garments. A pair of trousers might be tagged as a 34-inch waist when its actual measurement is closer to 36 inches. This creates chaos and inconsistency, making it impossible to trust the numbers on any label.
Vanity sizing has turned shopping for clothes into a guessing game. What is a size 'Large' at one shop could be a 'Medium' at another, rendering the labels almost meaningless for finding a consistent fit.
This manipulation of sizes completely erodes the reliability of any standard chart. You're not just fighting against outdated averages anymore; you're also navigating a landscape of deliberate misinformation. This is why taking your own measurements is so empowering. It gives you a single source of truth that cuts through all the noise and inconsistency. A bespoke approach doesn't care about labels; it cares about the precise numbers that define your unique form, ensuring the final garment is crafted for you and you alone.
Common Measuring Mistakes to Avoid
Even with the best suit measuring chart in hand, a few small slip-ups can throw off the entire fit of your garment. Getting it right the first time isn't just about saving hassle; it's about giving your tailor the exact blueprint they need to craft a suit that feels like a second skin.
Let's walk through the most common pitfalls I see and, more importantly, how to sidestep them.
Think of this as your troubleshooting guide to guarantee your numbers are spot-on.
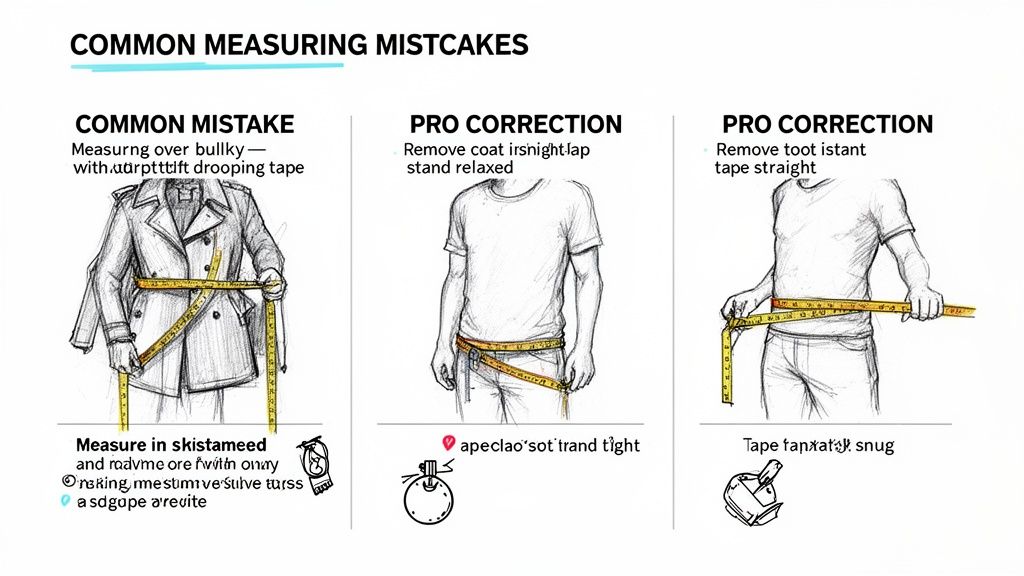
Mistake 1: Measuring Over Bulky Clothing
This is probably the most frequent error. Taking your chest measurement over a thick jumper or your waist over a pair of heavy jeans will add phantom inches, resulting in a suit that’s baggy and shapeless.
Pro Correction: Strip down to the essentials. Ideally, you should measure in your undergarments, but a thin, close-fitting t-shirt and trousers will also work. The goal is to get the tape as close to your body's true form as possible, without any extra bulk skewing the results.
Mistake 2: Sucking In or Tensing Up
The moment a measuring tape appears, it's almost a reflex to stand taller, suck in your stomach, or puff out your chest. While aspirational, this isn't how you stand day-to-day. A suit cut to these tense, unnatural dimensions will feel tight and restrictive the moment you relax.
Pro Correction: Just breathe. Stand in a natural, relaxed posture. Let your shoulders drop and your stomach be where it normally is. A bespoke suit isn't meant to force you into an uncomfortable shape; it's designed to drape perfectly over your natural one. Honesty here is the key to all-day comfort.
At Dandylion Style, we're all about honest measurements. We reject the deceptive practices that have plagued high-street fashion for decades. Since the 1980s, "vanity sizing" has distorted UK suit charts, with labels shrinking by 2-4 inches per decade to flatter expanding waistlines. This trend, which mirrored a 15% average male weight gain from 1980-2010, led to brands labelling a 42-inch chest as a '40R' to boost sales. The result? A 1995 study found 45% of men wore ill-fitting suits. Our bespoke process is the antidote, built on your true dimensions.
Mistake 3: Letting the Tape Measure Droop
An uneven tape measure is a surefire way to get a wrong number. If it sags at the back while you’re measuring your chest or waist, you're adding length that isn't there, which leads to a poor fit.
Pro Correction: A mirror is your best friend here, but having a partner help is even better. For any circumference measurement (like chest, waist, or hips), make sure the tape is perfectly horizontal and parallel to the floor all the way around. It should be snug, but not digging into your skin. Keep an even, gentle tension.
For a more detailed walkthrough on technique, you might find our guide on https://dandylionstyle.co.uk/how-to-measure-for-a-3-piece-suit particularly useful.
About the Author: Igor, Founder of Dandylion Style
Behind every impeccably crafted suit at Dandylion Style is the vision and quiet skill of our founder, Igor. His profound passion for the heritage of classic British tailoring led him to establish his Ardingly-based studio, creating a truly personal sartorial experience far removed from the impersonal nature of high-street retail. Igor’s philosophy is simple yet unwavering: a suit must be a genuine extension of the wearer's personality. It must be meticulously shaped from the finest cloths with an uncompromising commitment to craftsmanship.
Your Suit Measurement Questions Answered
Can I accurately measure myself for a suit at home?
Yes, you can certainly take accurate initial measurements at home. Use a soft tailor’s tape, wear thin clothing, and stand in a relaxed posture. Having a friend assist with hard-to-reach areas like shoulder width ensures greater precision. While these self-taken measurements are excellent for starting a made-to-measure consultation, a fully bespoke garment will always benefit from a professional tailor’s final in-person fitting. This is where subtle adjustments for posture and drape are perfected, elevating the suit’s final fit and comfort.
What is the ‘drop’ in a suit and why does it matter?
The 'drop' is the difference in inches between a suit jacket's chest measurement and the trousers' waist measurement. In off-the-rack suits, this is almost always a standard 6-inch drop (e.g., a 42-inch chest jacket comes with 36-inch waist trousers). This rigid formula is a major problem for anyone with an athletic or non-standard build, as it rarely matches individual proportions. This is a key reason why bespoke tailoring, which ignores the drop entirely, offers a superior and more comfortable fit.
How do I convert my measurements to standard suit sizes?
While a tailor works from your raw data, knowing your standard size is a useful reference. For jackets, UK and US sizes are the same (e.g., a 40R). To find your European size, simply add 10 to the UK/US number, making a 40R an EU 50. Trouser sizes are generally your waist measurement in inches. However, remember that vanity sizing can make labels unreliable. Your personal measurements from a suit measuring chart are always the most accurate guide for a truly perfect fit.
How much extra room or ‘ease’ should be in a suit?
'Ease' is the crucial comfort space a tailor adds to your body's exact measurements. It’s what allows you to move freely without the suit feeling restrictive. For a classic fit, a tailor might add 3-4 inches to the chest measurement and 2-3 inches at the waist. A modern slim-fit suit would have less, perhaps only 1.5-2 inches. The right amount depends on the fabric's properties, your personal style, and your posture. Always provide your true measurements and let your tailor apply their expertise.
If you'd like to understand more about the costs involved in perfecting a suit's fit, you might want to learn more about how much alterations cost in our detailed guide.
Ready to experience a suit crafted just for you? At Dandylion Style, Igor provides a calm, considered process to create a garment that is a true extension of your personality. Book your personal consultation today.