You're probably standing in front of a mirror with a shirt buttoned, collar up, tie hanging loose, and a small sense that this should be simpler than it feels. That's the usual moment when the Four-in-Hand earns its place. It's the knot a gentleman reaches for when he wants reliability, shape, and a touch of character without fuss.
It also happens to be the knot most men should learn first. It's quick, forgiving, and handsome in the right way. Not too bulky, not too studied. Just clean, slightly uneven, and alive.
Embracing the Effortless Elegance of the Four-in-Hand
You button the collar, throw on a tie, and the whole outfit still feels slightly unresolved. Then the knot goes in, the line sharpens, and the suit starts to make sense. That is the Four-in-Hand at its best. It gives a tie presence without making it look laboured.
It suits real wardrobes because it carries a bit of character. The shape is slim, a touch irregular, and far more forgiving than broader knots that demand the right collar, the right interlining, and a steadier hand. For many men, that makes it the knot they return to for work, weddings, dinners, and the ordinary mornings that still call for proper dress.
There are also days when the better decision is no tie at all. If you are weighing an open collar against a finished look, a suit without a tie can still look polished. When a tie does belong, though, the Four-in-Hand is usually the cleanest place to start.
Key takeaways
- The Four-in-Hand is widely taught first because the method is straightforward and the shape is easy to wear.
- It has real British pedigree, with longstanding ties to 19th-century dress and club culture.
- Its appeal lies in the shape. Slight asymmetry gives it life and keeps it from looking stiff.
- Fabric weight changes the result in ways many guides ignore. A printed silk folds differently from grenadine, wool, or a heavily interlined bespoke tie.
- Finish matters. Length, tension, and a clean dimple decide whether the knot looks intentional or careless.
A knot with proper British heritage
The Four-in-Hand has history behind it, not just habit. It entered British fashion in the mid-19th century and is often linked to the Four-in-Hand Club, a London gentlemen's club associated with driving and dress. Ties4him's history of the Four-in-Hand also notes the older carriage-driving connection, with the name referring to handling the reins of four horses in one hand.
That background suits the knot. It has always looked best when worn with confidence rather than fuss.
Why beginners keep returning to it
A good first knot should teach control. The Four-in-Hand does that by rewarding sensible tension and punishing overhandling. Pull too hard and it turns mean and pinched. Leave it too loose and it slips into untidiness.
Construction changes the result more than many men expect. A light silk tie with soft interlining will settle into that familiar slight asymmetry with very little resistance. A heavier wool, a textured shantung, or a bespoke tie with more body will produce a thicker, more sculpted knot from the same method. That is not a flaw. It is one reason the same Four-in-Hand can look rakish on one tie and subtly formal on another.
Cloth's properties are critical. In the workroom, fabric weight and interlining are never abstract details. They decide how the blade rolls, how the knot grips, and whether the dimple holds by itself or needs coaxing. Once you understand that, the Four-in-Hand stops being a basic knot and starts becoming a reliable tool.
Tying the Four-in-Hand Knot A Step-by-Step Guide
The mechanics are simple once you stop trying to move both ends. In a proper Four-in-Hand, the narrow end stays still and the wide end does the work. That one discipline makes the knot far easier to repeat cleanly.
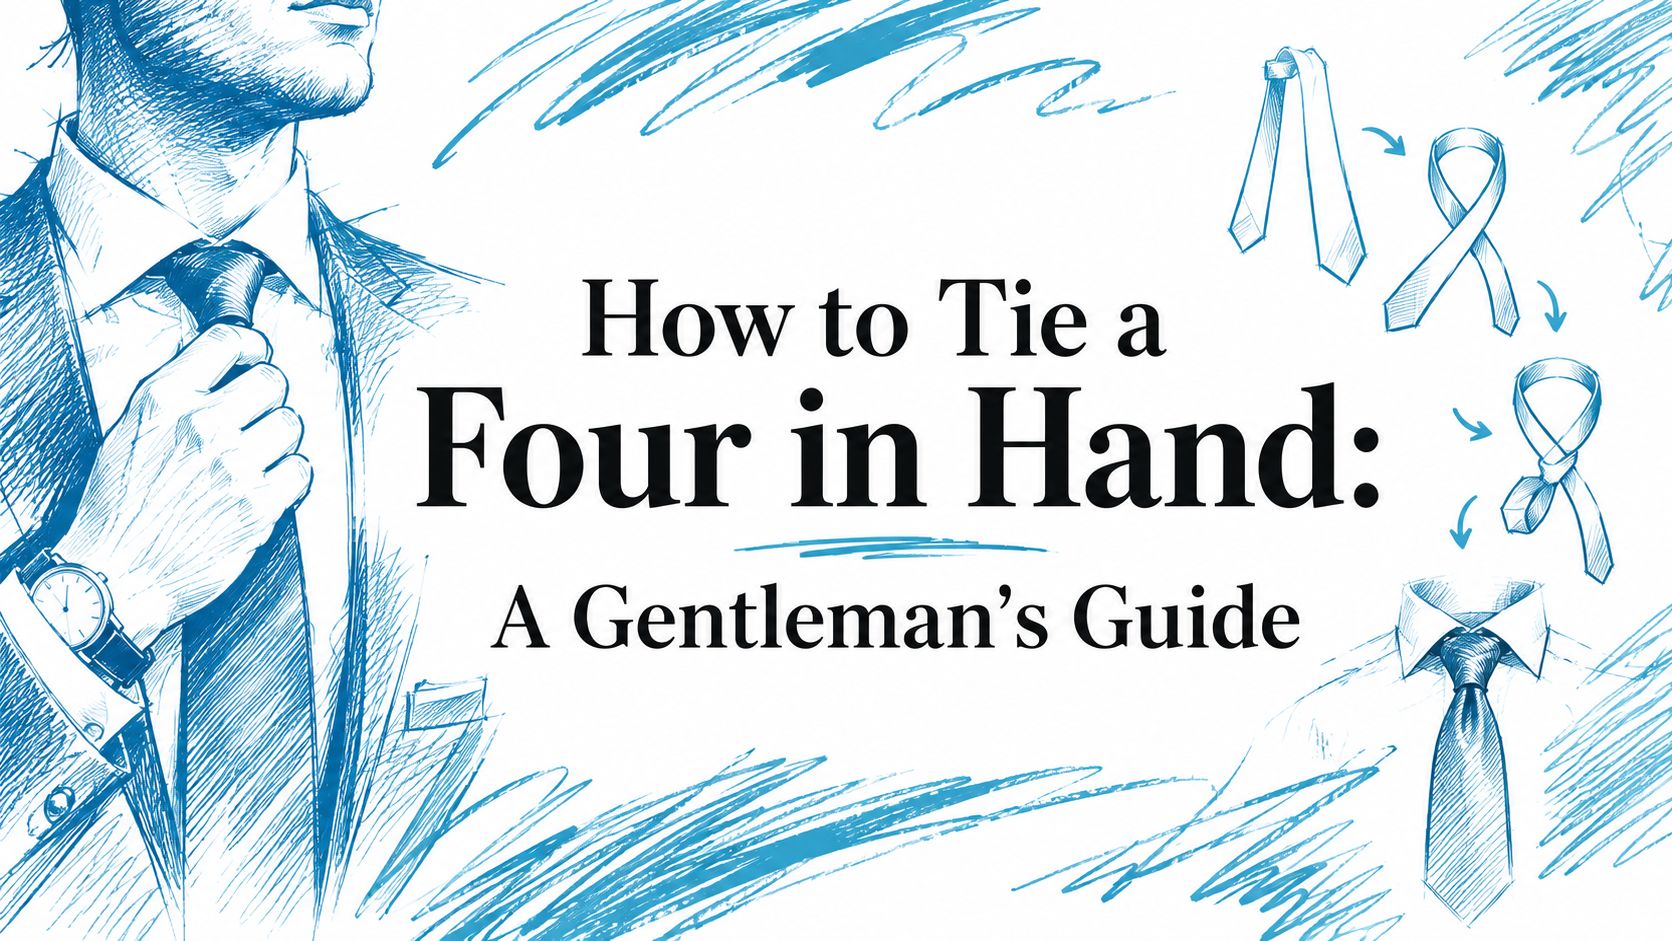
Here is the visual guide to keep beside the mirror.
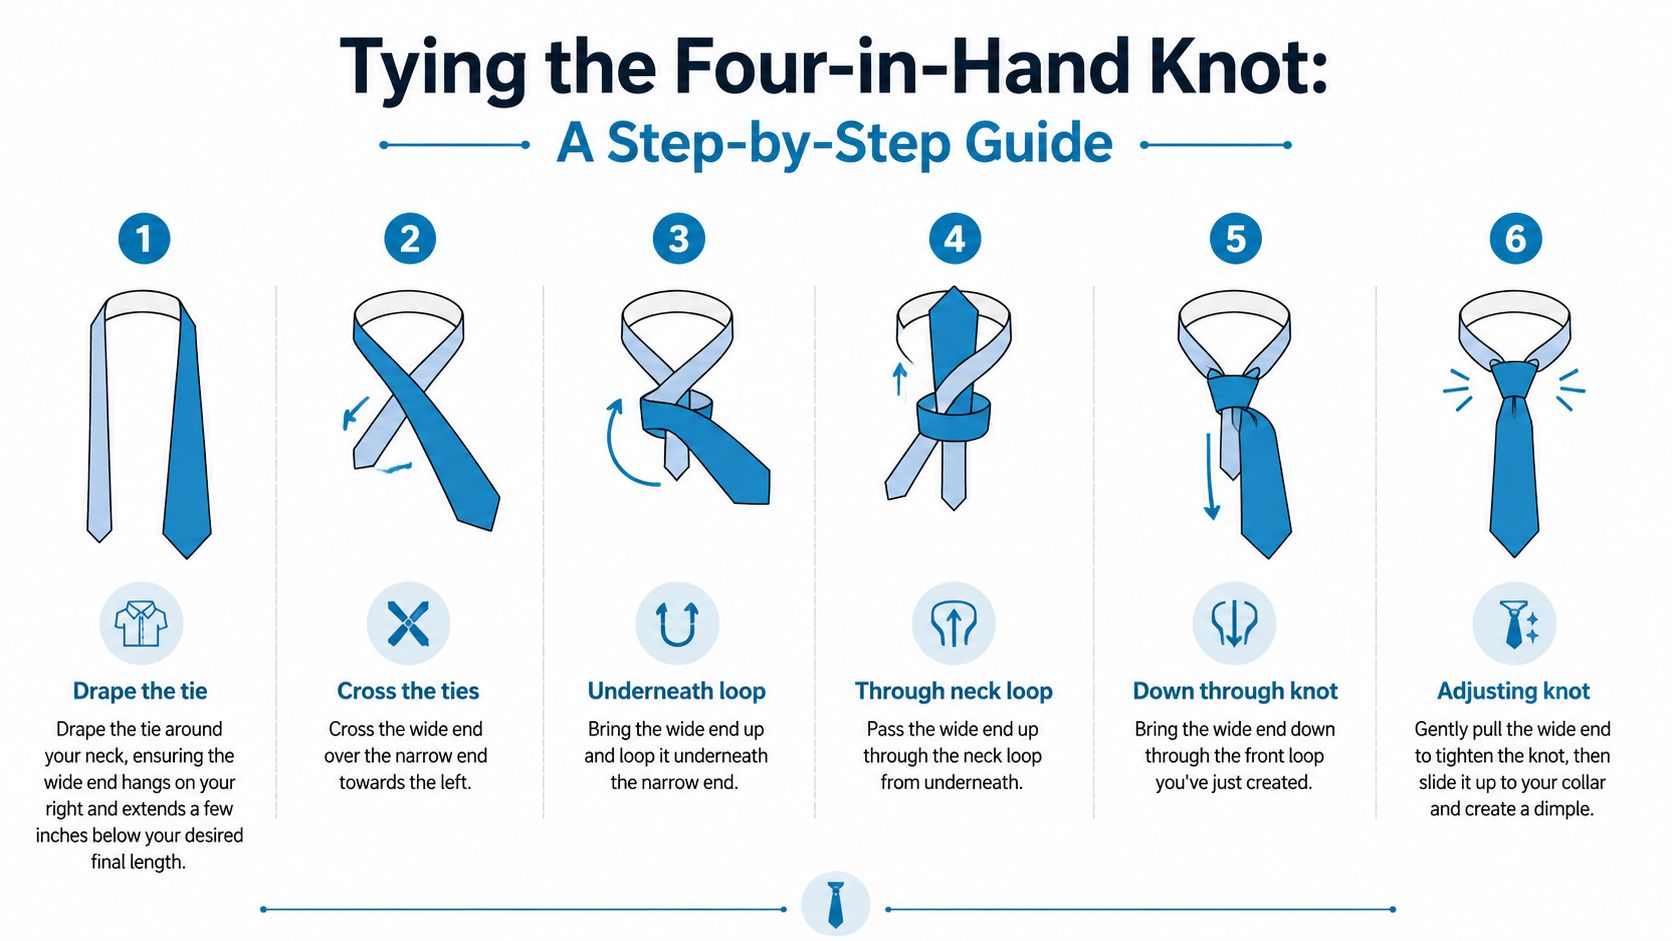
Setting the tie before you start
Raise your collar and drape the tie around your neck with the wide end on the right and the narrow end on the left. Let the wide blade hang lower than you think you need at first. You can fine-tune that with practice, but if you begin too short, the knot rarely recovers gracefully.
Keep the narrow end resting against the shirt front. Don't keep tugging at it. That's one of the habits that throws the knot off balance before it's even formed.
Keep your attention on one moving part. When the wide end does all the travelling, the knot forms with far more consistency.
The motion that forms the knot
The standard sequence is straightforward and well established in British instruction. Start with the wide end crossing over the narrow end. Then take it underneath, bring it back across the front, lift it up through the neck loop, and pass it down through the front loop before tightening, following the method described by Moss's guide to the Four-in-Hand knot.
That reads more complex than it feels in the hands. In practice, the rhythm is this:
- Cross over and create the front face of the knot.
- Pass underneath so the wrap begins to build.
- Cross across the front again to form the loop you'll tuck through.
- Bring the wide end up through the neck loop from beneath.
- Feed it down through the front loop and draw it through carefully.
The important part is tension. Not tight everywhere. Controlled. If you wrench the tie at each stage, the knot becomes cramped and twisted. If you leave everything loose, it collapses.
Tightening it the right way
Once the wide end comes through the front loop, pinch the knot lightly and pull the wide blade down to settle the structure. Then slide the knot upward toward the collar. Don't drag the narrow end up to fake the finish. Move the knot itself.
This is the point where many men ruin an otherwise good attempt by rushing. Slow hands make a cleaner knot.
If you also wear evening dress from time to time, it's worth learning how to tie a bow tie properly. The discipline is similar. Controlled fingers, even tension, and respect for fabric.
What the knot should look like
A proper Four-in-Hand should be:
| Element | What you want |
|---|---|
| Shape | Slim and slightly tapered |
| Character | A touch asymmetrical, not perfectly blocky |
| Position | Snug at the collar |
| Surface | Smooth, with some depth rather than a flat front |
In formal mathematical notation, the Four-in-Hand is designated knot 2 in The 85 Ways to Tie a Tie by Thomas Fink and Yong Mao, and the knot sits within a system of exactly 85 possible ways to tie a necktie using the conventional wrapping method, as recorded in the Wikipedia article on the necktie. Its notation sequence is Li Ro Li Co T, which neatly confirms what your hands are already doing.
Perfecting the Details Fit Length and the Dimple
You notice these details the moment someone fastens the top button and stands straight. A Four-in-Hand can be tied correctly and still look unfinished if the blade length is off or the knot sits flat and lifeless under the collar. With a well-made tie, especially one cut with proper interlining and balanced by hand, those small corrections matter more because the cloth shows both good handling and bad handling very clearly.
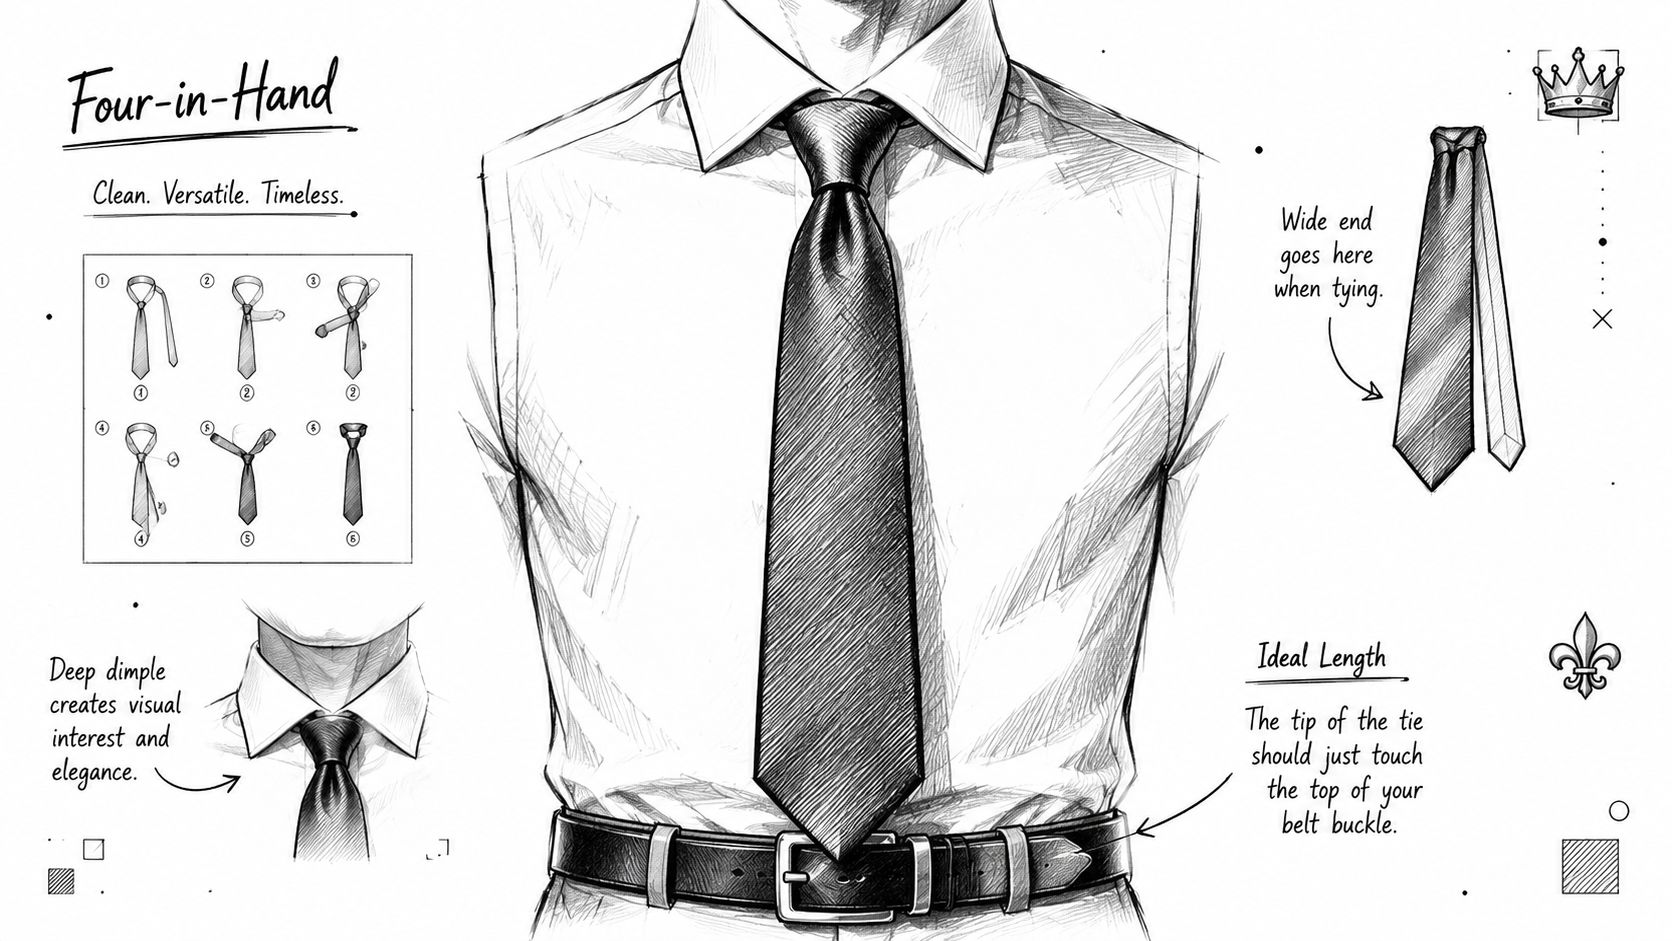
Getting the length right from the start
Length is set before the knot has even taken shape. If you begin with the wide blade too high, you will spend the rest of the process compensating. If you begin too low, the tie finishes long and heavy at the front.
A reliable starting point is to let the wide end hang noticeably lower than the narrow end before the first cross, then adjust from there according to the tie's build and your height. A light printed silk usually consumes less length in the knot than a heavier grenadine, wool, or seven-fold tie with more body. Bespoke construction changes this as well. A tie with substantial interlining produces a fuller knot and uses more cloth on the way up to the collar, so the starting position often needs a little more drop than a thin, slippery tie. Guidance on both the starting position and the proper finished endpoint can be found in Diary of London's tie-tying guide.
The finished wide blade should meet the belt buckle or sit around the middle of the waistband. That line keeps the proportions clean with both tailoring and casual jackets. For a fuller explanation of proportion, this guide on the correct length of a tie is useful alongside mirror practice.
The dimple is shaped by the cloth
The dimple is the small hollow just beneath the knot. It gives the Four-in-Hand depth and a touch of movement. Without it, the front of the tie can look broad and dead, particularly in smooth silk.
Form it before the knot is fully tightened. Pinch the fabric just under the centre of the knot, hold that fold in place, and slide the knot up with controlled pressure. The cloth should crease inward once, cleanly.
Fabric weight decides how easy this will be. Heavier wools and densely woven silks tend to hold a dimple with very little persuasion, but they can also become clumsy if you pinch too hard. Lighter printed silks need a gentler hand and more precise tension or the dimple disappears the moment you straighten the blade. A well-made tie helps because the interlining supports the fold instead of fighting it.
Quick corrections at the mirror
| Symptom | Likely cause | Fix |
|---|---|---|
| Wide blade finishes above the waistband | Wide end started too short, or the knot took up more cloth than expected | Start again with the wide blade slightly lower |
| Wide blade drops below the waistband | Wide end started too low | Raise the starting position before the first cross |
| Dimple collapses after tightening | Cloth is too slick, or the pinch was made too late | Form the dimple earlier and hold the pinch as the knot slides up |
| Knot looks bulky and short | Tie fabric or interlining is heavy for a tight wrap | Loosen your hand slightly and allow the knot to settle instead of compressing it |
| Knot drifts off-centre | Uneven tension through the wraps | Reset and tighten each stage with the same pressure |
Good results come from reading the cloth, not forcing it. That is the difference between merely tying a Four-in-Hand and wearing one well.
Styling Your Knot Collars Fabrics and Occasions
The Four-in-Hand is often described as versatile, and that's true, but versatility isn't the same as sameness. The knot changes character depending on the collar framing it and the fabric from which the tie is made. That's where many generic guides fail. They show one silk tie, one shirt, one result, as if cloth has no say in the matter.
In practice, cloth changes everything.
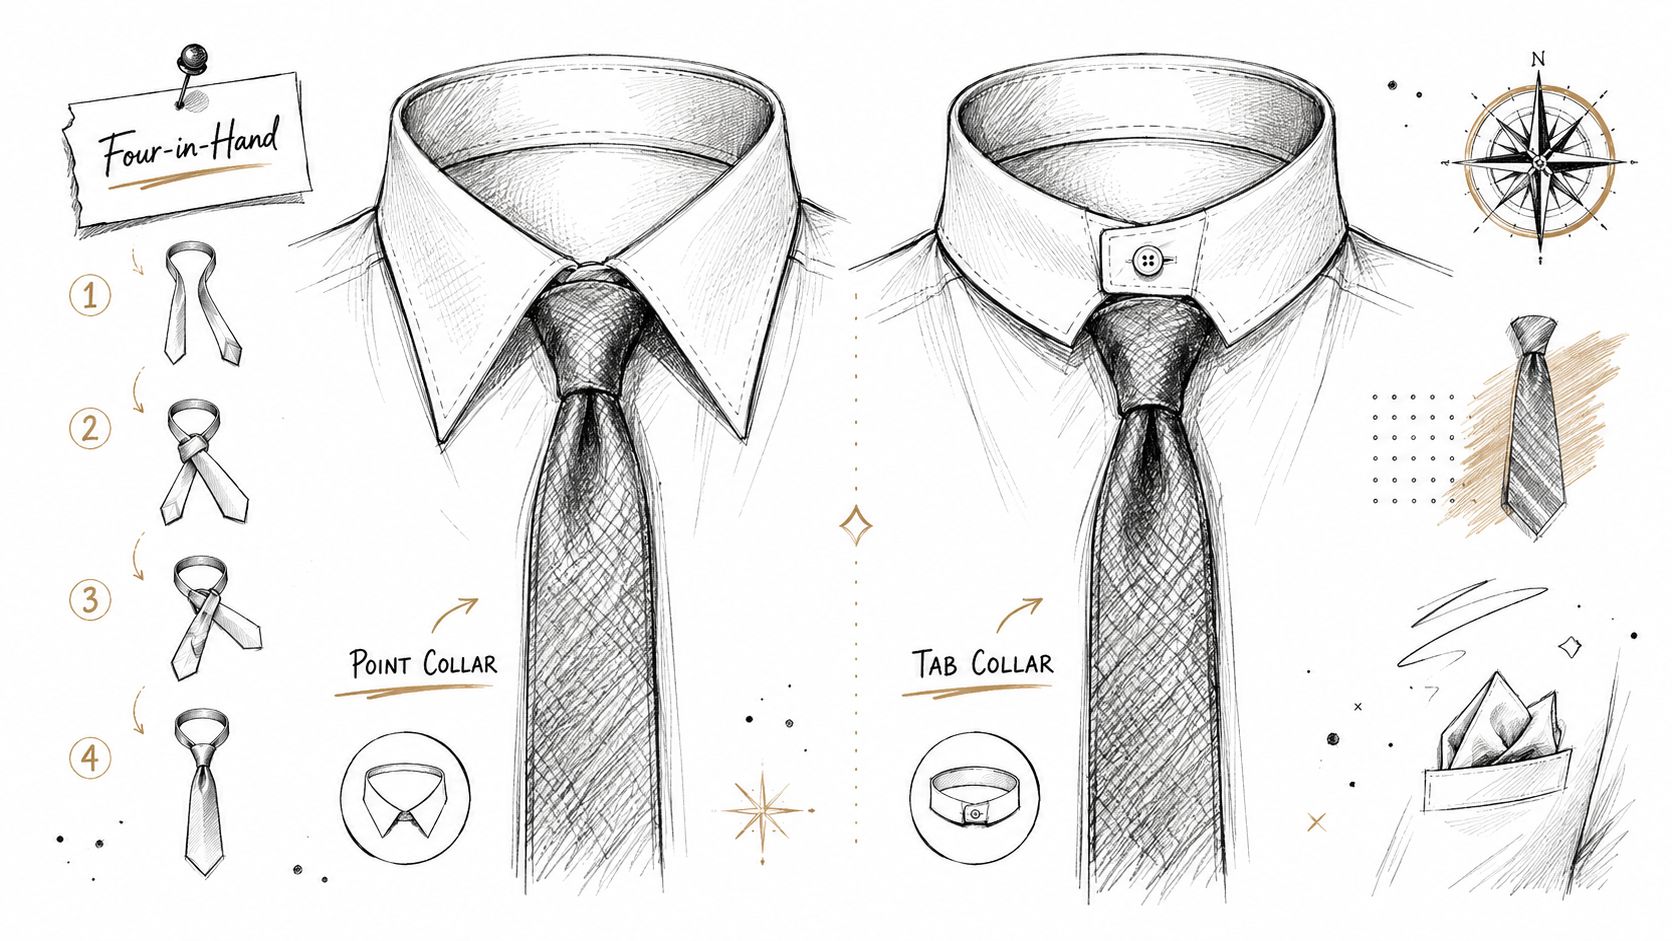
Matching the knot to the collar
The Four-in-Hand's narrow, slightly irregular shape tends to sit best with point collars and tab collars. These collar styles frame the knot neatly without demanding too much width. The knot looks intentional rather than undersized.
With a very wide spread collar, the Four-in-Hand can still work, but the balance becomes more delicate. The knot may look too lean for the collar unless the tie fabric has enough body to give it presence. If you're planning combinations carefully, a guide to shirt and tie pairings helps you judge the relationship as a whole.
Why fabric weight changes the result
This is the part worth understanding if you care how a tie behaves. Heavier fabrics like 14–16 oz wool resist the signature dimple and require a tighter initial loop, a nuance often omitted in simpler demonstrations. A video-based review also notes that 92% of UK tie tutorials use only lightweight silk examples, which leaves a gap in advice for men wearing seasonal British cloths such as wool and tweed, as discussed in this fabric-focused Four-in-Hand tutorial.
That rings true in the workroom. Lightweight silk slips into shape quickly. Wool has more memory and more resistance. Cashmere blends can soften beautifully, but they don't respond to rough handling. Tweed ties often need firmer setup and a steadier pinch to produce a neat front.
What works for different occasions
Use the Four-in-Hand when you want polish without stiffness. It suits business dress, country weddings, lunches, day events, and most forms of smart daily wear. Its ease is part of its appeal.
A simple comparison helps:
| Occasion | Why the Four-in-Hand works |
|---|---|
| Business wear | Clean, efficient, not overly formal |
| Wedding guest attire | Elegant without competing with the occasion |
| Rustic or country weddings | Pairs well with textured ties in wool or silk blends |
| Black tie | Usually the wrong choice. A bow tie belongs here |
A tie knot should suit the cloth and collar, not merely the instruction card that came in the box.
Common Four-in-Hand Mistakes and How to Fix Them
Most failures come from haste, not difficulty. The Four-in-Hand is simple, but simple things show mistakes clearly. A twisted wrap, a flat front, or a loose collar fit can spoil the effect in seconds.
The good news is that each problem has a clean remedy.
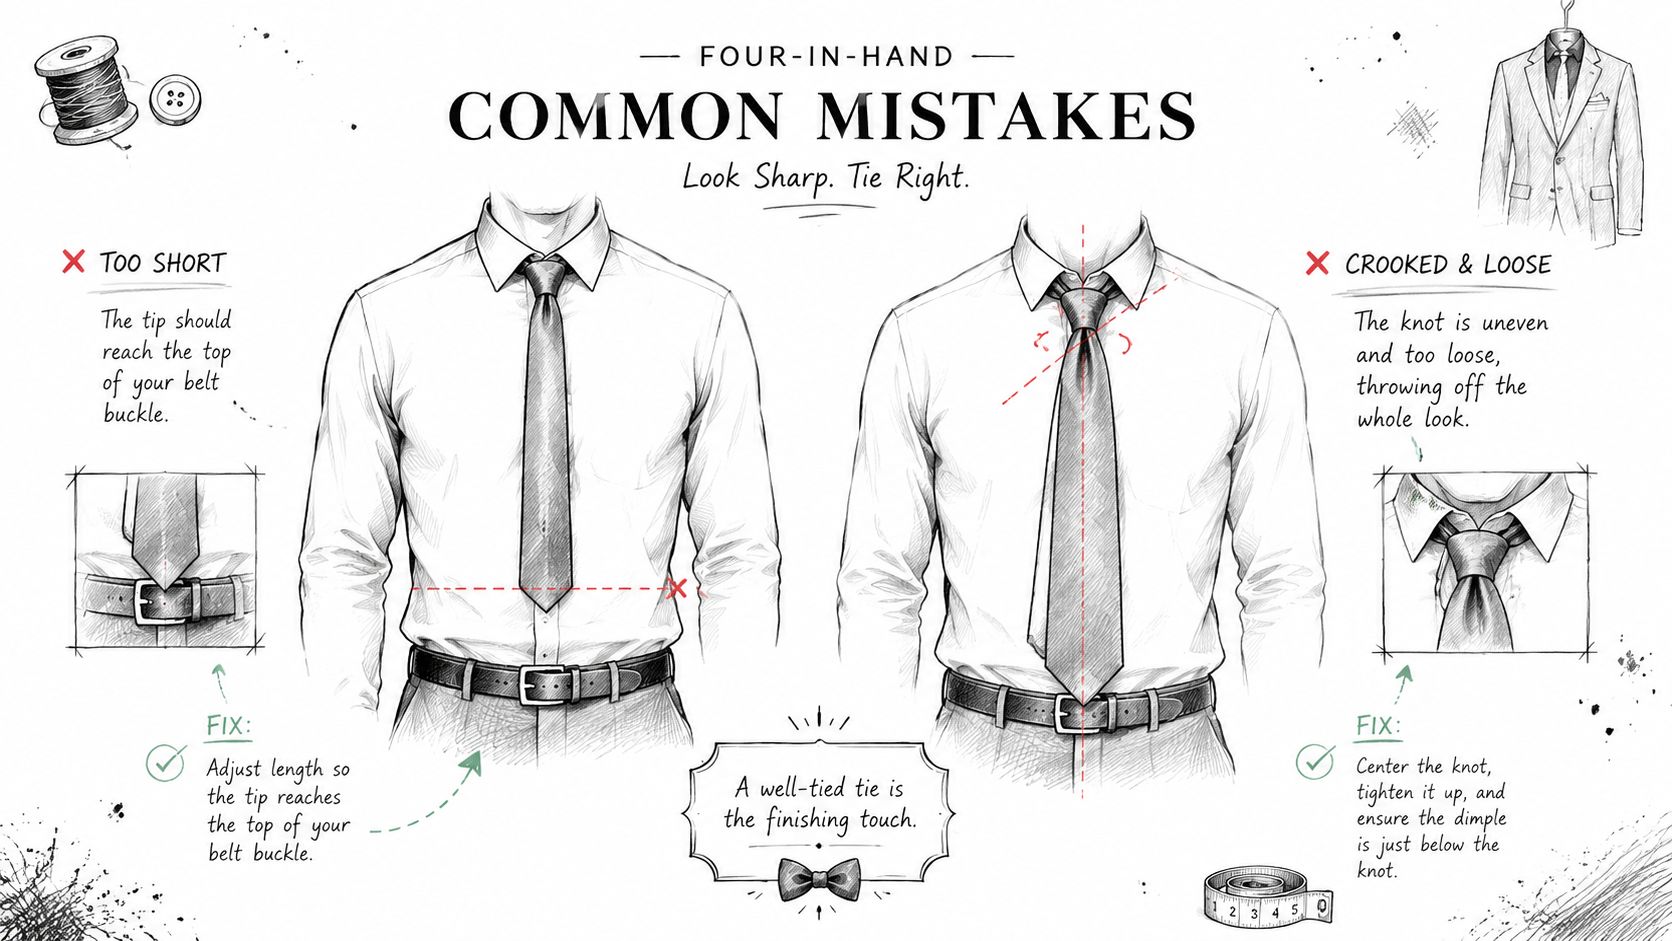
The knot looks flat
This is the most common aesthetic mistake. The Four-in-Hand relies on a touch of sculpting. A deliberate dimple under the knot's centre prevents that lifeless look and increases aesthetic success rates by over 60% in professional assessments, according to this instructional demonstration on creating a proper dimple.
Fix it by pinching the tie beneath the knot before final tightening. Don't try to press a dimple in after the knot is fully set.
The tie is too long or too short
This starts before the knot starts. If the finished blade misses the waistband, reset the starting position rather than trying to rescue the result halfway through. Small adjustments at the beginning save repeated frustration.
If your tie consistently finishes too short, let the wide end begin lower next time. If it finishes too long, start with less drop.
The knot twists or sits off-centre
Twisting usually comes from uneven tension or from moving both ends. Keep the narrow end still. Shape the knot with the wide end, then slide the finished knot into place.
A practical fix is to keep the front loop slightly open with one finger as you feed the wide end through. That preserves the face of the knot and helps avoid awkward creasing.
The knot sits away from the collar
Don't pull the narrow end upward to close the gap. Slide the knot itself upward until it sits snugly at the collar base. The Four-in-Hand should look settled, not suspended.
A tie knot doesn't need brute force. It needs direction.
Frequently Asked Questions and About the Author
Is the Four-in-Hand meant to look slightly uneven
Yes. A slight asymmetry is part of the knot's character and one reason it looks more natural than broader, more architectural knots. Slightly uneven isn't the same as messy, though. The knot should still sit neatly against the collar, with a clean front and a controlled taper. If it looks twisted or collapsing to one side, that's poor tension, not charm.
Can I wear a Four-in-Hand with a spread collar
You can, but the result depends on proportion. A point or tab collar usually flatters the knot more easily because the Four-in-Hand is relatively slim. With a wider spread, the collar can outscale the knot and leave too much visual space. If you do pair them, choose a tie fabric with enough body to give the knot a little more presence and avoid a flimsy finish.
Should I always make a dimple
If you want the knot to look finished, yes. The dimple adds depth and prevents the front from looking flat. It's especially helpful with the Four-in-Hand because the knot is prized for character rather than bulk. The trick is to form it as you tighten, not after. A forced dimple made at the end usually creates harsh creases instead of a clean central hollow.
How should I untie the knot without damaging the tie
Reverse the process gently. Loosen the knot, pull the wide end back through the front loop, then through the neck loop, and unwrap it without yanking. Don't drag the narrow end through a tightened knot. That strains the fabric and shortens the life of the tie. Once removed, hang it or roll it lightly so the cloth can relax and the creases can settle out.
About the author
Igor is the founder of Dandylion Style, a bespoke tailoring house in Ardingly, West Sussex. His work centres on one-of-a-kind garments cut from fine British cloths, with particular attention to proportion, drape, and how garments behave in real life rather than only on a fitting stand. You can read more about Igor's background and tailoring philosophy.
If you'd like help refining your wardrobe beyond the knot itself, Dandylion Style offers bespoke tailoring, shirts, waistcoats, handmade ties, and thoughtful guidance for weddings, business dress, and everyday gentleman's tailoring.