To measure yourself for a suit, you'll need a soft measuring tape and, ideally, a friend to help get the numbers spot-on. The key is to stand naturally and wear thin clothing. You'll measure key points like your chest, shoulders, waist, and inseam, pulling the tape snug but never tight. And a pro tip? Always measure twice to guarantee the best possible fit.
Key Takeaways
- Preparation is Paramount: Use a soft, flexible measuring tape, wear thin, fitted clothing, and ask a friend to help for accuracy. Stand in a relaxed, natural posture—don't suck in your stomach or puff out your chest.
- Critical Jacket Measurements: Focus on four key areas: the chest (at its fullest part), shoulders (from seam to seam), sleeves (allowing a quarter-inch of shirt cuff to show), and jacket length (to cover your seat).
- Essential Trouser Measurements: Accurately measure your natural waist (not where your jeans sit), hips (at the fullest point), rise (for comfort), and both the inseam and outseam for the perfect trouser break.
- Avoid Common Errors: Never measure over bulky clothes, ensure the tape is level and not drooping, and write down each measurement immediately. Always measure twice to confirm your numbers.
- Know When to Call a Pro: While self-measuring is useful, a professional tailor is essential for major events or if you have a non-standard body shape. They understand nuance, posture, and proportion in a way a tape measure alone cannot.
The Foundation of a Flawless Suit Fit
Getting your suit measurements right is the single most important step towards achieving that sharp, perfectly tailored look. A suit that fits properly doesn't just look better; it feels incredible, moving with you and giving you a kind of confidence that you just can't get off the rack.
This guide is designed to walk you through the exact process we use with our clients at Dandylion Style. We'll show you how to prepare properly to avoid the common mistakes that can throw everything off. After all, inaccurate measurements are the number one reason for a poor fit, leading to jackets that pinch at the shoulders or trousers that are uncomfortably tight in the seat.
Your Measurement Preparation Checklist
Before you even think about unrolling that measuring tape, it pays to get your setup right. Proper preparation is the blueprint for a garment that truly fits. Just take a few minutes to gather these essentials and follow our advice—it makes all the difference.
| Item or Action | Why It's Crucial | Dandylion Style Pro Tip |
|---|---|---|
| Soft, Flexible Measuring Tape | A rigid builder's tape simply won't curve around your body, leading to completely wrong readings. A soft tailor's tape is non-negotiable. | Look for a tape measure that has both inches and centimetres. It's a small detail that helps prevent conversion errors down the line. |
| A Trustworthy Assistant | Let's be honest, it's nearly impossible to measure your own back, shoulders, or sleeve length accurately. A friend ensures the tape stays level and is positioned just right. | Your assistant doesn't need to be a professional. Just find someone who can follow simple instructions and read the tape without guessing. |
| Thin, Fitted Clothing | Measuring over bulky items like a jumper or loose-fitting jeans will add extra inches to your measurements, completely skewing the final fit. | Stick to a well-fitted t-shirt and a pair of thin trousers or chinos. This gives us a true-to-form outline of your body without adding any bulk. |
| Normal, Relaxed Posture | Don't suck in your stomach or puff out your chest. Your suit needs to fit the real you, not a forced, unnatural stance. | Stand up straight but stay relaxed, with your arms hanging naturally at your sides. Just breathe normally throughout the process. |
| Pen and Paper (or Notes App) | Write down each measurement the second you take it. Trying to rely on memory is a recipe for mistakes, plain and simple. | We always recommend measuring everything twice. If you get two different numbers, take a third measurement to find a reliable average. |
By following this checklist, you're setting yourself up for success. Taking these few extra minutes to prepare properly will save you a world of time and potential disappointment later. Understanding the fundamentals of a tailor-made suit starts right here, ensuring every measurement is built on a solid, accurate foundation.
Nailing Your Jacket Measurements
The jacket is the cornerstone of your suit. Its fit across your upper body defines your entire silhouette, so getting this part right is the first step towards achieving that sharp, commanding look. We're going to break down precisely how to measure the four key areas: the chest, shoulders, sleeves, and the jacket's overall length. These aren't just numbers; they work in harmony to create balance, structure, and genuine comfort.
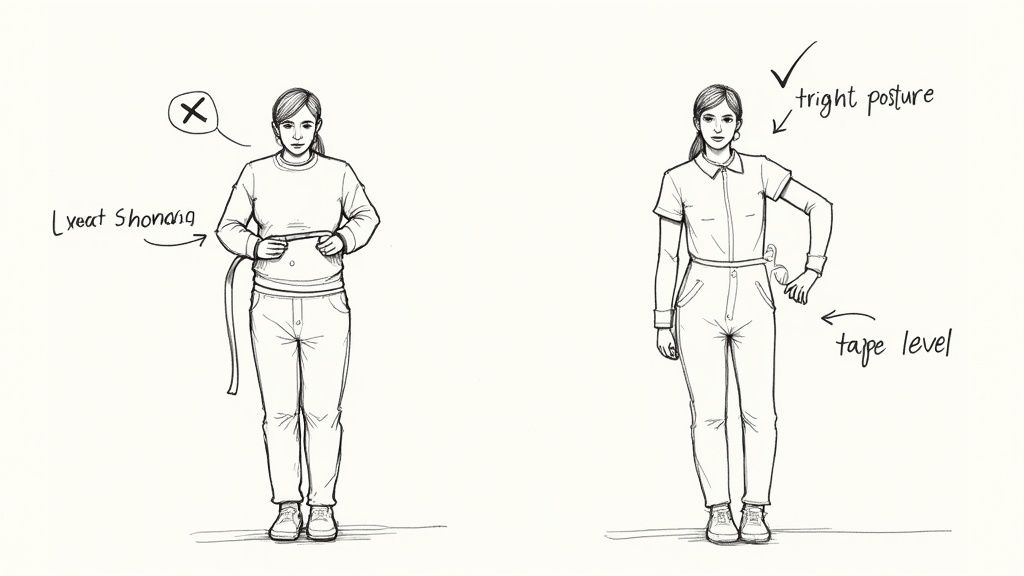
Before we dive in, a simple visual guide can help set the stage and reinforce the three core preparation steps we covered earlier.

This quick visual is a great reminder that having the right tools, a helpful partner, and the correct attire are the non-negotiable foundations for getting accurate results.
Mastering The Chest Measurement
Your chest measurement is arguably the most fundamental number for your jacket. It dictates the base size and ensures you have enough room to move comfortably without the fabric pulling or, just as bad, looking baggy.
To measure your chest, stand in a relaxed, natural posture with your arms hanging loosely at your sides. Your assistant should wrap the soft measuring tape around the fullest part of your chest, which is usually just under your armpits. It's crucial that the tape is kept level and parallel to the floor all the way around your back. Don't be tempted to puff out your chest or suck in your stomach; just breathe normally.
The tape should feel snug against your body but not tight enough to compress it. A good rule of thumb is that you should be able to slide one finger comfortably between the tape and your body.
A Tailor's Insight: The most common mistake we see is pulling the tape too tight. This gives a compressed number and leads to a jacket that feels restrictive across the chest and back. The goal is to capture your natural posture, not a squeezed version of it.
Understanding UK sizing can also be helpful. UK suit sizes are primarily based on the chest circumference in inches, typically ranging from 34 to 46. This number forms the baseline, but other dimensions like sleeve length and shoulder width require their own precision for a truly well-fitting garment.
Defining Your Shoulders
The shoulder measurement is what gives a jacket its structure. It's a make-or-break detail. A perfectly measured shoulder seam should sit exactly where your shoulder ends and your arm begins. If it’s too wide, the jacket will look sloppy and oversized. Too narrow, and it will bind, creating pulling across the upper back and restricting your movement.
For this one, have your assistant place the end of the tape at the very top of one shoulder, right at the point where the arm meets the shoulder—you can often feel the bone here. They will then run the tape measure straight across your back to the same point on the opposite shoulder. It’s important that the tape follows the natural curve of your upper back. A well-fitting shirt is a great guide here; you can simply measure from one shoulder seam to the other.
Getting The Sleeve Length Just Right
Sleeve length is one of those subtle details that separates a good suit from a great one. The ideal length allows about a quarter to half an inch of your shirt cuff to show, creating a clean, layered, and intentional look.
Here's how to get an accurate sleeve measurement:
- First, stand with your arm completely relaxed and hanging straight down at your side.
- Your assistant should place the measuring tape at the same bony point on your shoulder where the shoulder measurement ended.
- From there, they'll run the tape down the outside of your arm.
- The measurement should end right where you want the jacket cuff to sit—typically at the prominent bone on your wrist.
Always remember to measure both arms. It's not uncommon for them to be slightly different lengths, and we always use the longer measurement to ensure both sides are properly covered. Your preference for a slim vs tailored fit can also influence how you approach this, as a slimmer cut might require a little more precision to maintain comfort and proportions.
Balancing Proportions With Jacket Length
The final piece of the jacket puzzle is its length. This measurement determines the overall balance of your silhouette and can dramatically alter your perceived height and proportions. While trends for shorter or longer jackets come and go, a classic length offers timeless style.
There are a few ways to determine the correct length, but we find this one to be the most reliable. Stand up straight with your arms hanging naturally at your sides. As a general rule, the jacket should be long enough to cover your seat.
For a more precise guide, have your assistant measure from the base of the back of your neck (right where the collar of a shirt would sit) down to the point where your fingers naturally curl into your palm. This classic method ensures the jacket is long enough to create a balanced look, dividing your body in a flattering way.
Perfecting Your Trouser Measurements
Well-fitting trousers are the unsung hero of a great suit. They anchor your entire look, creating a clean, uninterrupted line from your waist to your shoes while providing all-day comfort. The jacket might get all the attention, but poorly fitting trousers can completely undermine the silhouette. Here, we'll cover the five crucial lower-body measurements you need to master: waist, hips, rise, inseam, and the outseam.
Unlike a jacket, which has a certain amount of structure, trousers need to move with you. Every single measurement, from the circumference of your waist to the length of your leg, contributes to this harmony of fit and function. Let’s get into how you can capture each one accurately.
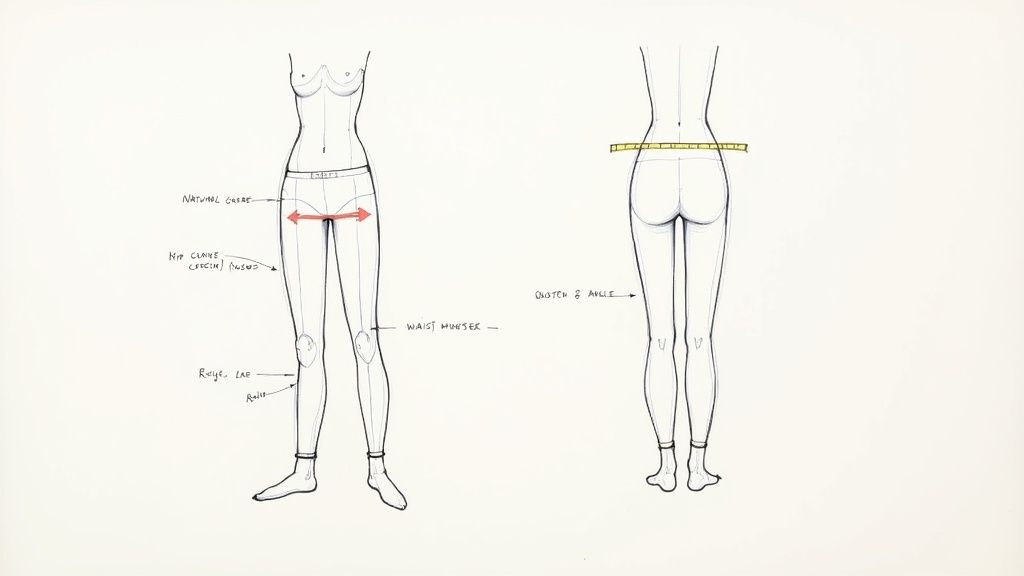
Finding Your True Waistline
This is where most people get it wrong. The biggest mistake is measuring where your casual jeans or chinos sit. This is almost always incorrect for a suit. Most casual trousers are designed to sit lower on the hips, but suit trousers should sit higher, at your natural waist, for better support and a much more elegant drape.
So, how do you find it? It's simple. Stand up straight and bend to one side. See that crease that forms in your side? That's your natural waistline, and that’s your measuring point.
Have your partner wrap the measuring tape around this line, keeping it perfectly level with the floor. The tape needs to be snug against your skin, but not digging in at all—you should just be able to slip one finger between the tape and your body. Just remember to stand relaxed and don't be tempted to suck in your stomach.
Securing The Hip Measurement
The hip—or seat—measurement is absolutely vital for comfort, especially when you're sitting or moving. If it's too tight, you'll get pulling across the seat and the pockets will flare open. On the other hand, if it’s too loose, you’ll end up with baggy, unflattering excess fabric.
To get this right, stand with your feet together. Your partner should then wrap the tape measure around the fullest part of your hips and buttocks. Just like with the chest and waist, check that the tape is parallel to the floor all the way around. This measurement should be taken snugly, but without any sense of restriction.
Why This Measurement Matters: The difference between your hip and waist measurement determines the "drop" for your trousers. An accurate hip measurement allows a tailor to craft trousers that follow your body's natural contours without bunching or pulling, which is a hallmark of truly made-to-measure trousers.
Understanding The Trouser Rise
The rise is one of the most overlooked yet impactful measurements on a pair of trousers. It determines exactly where the trousers sit on your body and has a massive influence on both comfort and style. The rise is simply the distance from the crotch seam right up to the top of the waistband.
There isn't a single "correct" rise; it really comes down to proportion and personal preference.
- High-Rise: Sits right at or just above the natural waist. This style has a classic, traditional look that does a great job of elongating the legs.
- Mid-Rise (or Regular-Rise): Sits just below the natural waist. This is the most common and versatile option out there, striking a nice balance between comfort and a modern silhouette.
- Low-Rise: Sits down on the hips. This is a more contemporary, fashion-forward choice, though you see it less often in formal suiting.
The best way to measure your preferred rise is to use a pair of existing trousers that fit you perfectly in this area. Just lay them flat and measure from the crotch seam (where the four seams meet) straight up to the top of the front waistband. This gives your tailor a crystal-clear reference point.
Distinguishing Inseam and Outseam
Finally, we get to the length, which is defined by two separate but related measurements: the inseam and the outseam. Getting these right is the key to achieving the perfect "trouser break"—that subtle fold of fabric that rests elegantly on your shoes.
The Outseam Measurement
The outseam is the total length of the trouser leg, measured down the outside. Have your partner place the tape at the very top of where your trouser waistband will sit (your natural waist) and run it down the side of your leg. The measurement should stop precisely where you want the trousers to end. It's essential to wear your dress shoes for this part, as it dictates the final length.
The Inseam Measurement
The inseam measures the leg's length from the inside. Your partner should place the end of the tape high up at your crotch and measure straight down the inside of your leg to the same point on your ankle where the outseam measurement finished. Make sure you're standing with your legs straight but not locked. An accurate inseam is what prevents trousers from riding up or feeling tight through the crotch.
By taking the time to nail these five lower-body measurements, you’re providing the essential blueprint for trousers that aren't just stylish, but exceptionally comfortable. It’s this attention to detail that transforms a simple suit into a garment that feels like a second skin.
Common Measurement Mistakes to Avoid
Even with the best intentions, tiny errors when you're holding the tape measure can lead to a suit that just doesn't sit right. Knowing how to measure yourself is one thing, but sidestepping the common pitfalls is what truly guarantees a flawless result. Let’s walk through the most frequent mistakes so you can get it right the first time.
One of the biggest issues we see is people changing their posture while taking measurements. Sucking in your stomach or puffing out your chest might feel like you’re getting an aspirational number, but it gives a false reading. A suit is meant to fit your natural, relaxed state.
The fix is simple: just breathe normally and stand comfortably. Your suit is for your real-world posture, not the one you hold for a few seconds in the mirror.
The Problem with Posture and Positioning
Incorrect posture is the silent culprit behind so many fit issues. If a suit is cut for a tensed, unnatural stance, it will feel restrictive and look plain awkward the moment you relax into your normal posture.
Another classic error is letting the measuring tape droop or twist, especially when you're trying to measure across your back for the chest or shoulders. The tape has to stay perfectly parallel to the floor to capture an accurate circumference. Likewise, measuring over bulky clothes—think a hoodie or even a thick pair of jeans—will add unwanted inches, resulting in a garment that hangs off you.
Here are the top positioning mistakes to watch out for:
- The "Suck It In" Mistake: Taking your waist measurement while breathing in will get you trousers you can't comfortably sit down in.
- The "Shoulders Back" Error: Pulling your shoulders back too far creates a false width, leading to a jacket with overextended, sloppy-looking shoulder pads.
- The Drooping Tape: Allowing the tape to sag across your back can easily shave an inch or more off your chest measurement, which means a tight, constricting fit.
A tailor's job isn't just to write down numbers; it's to understand the body they belong to. Accurate measurements reflect a person's natural state—that's the real foundation of a comfortable and flattering suit.
Conversions and Calculations
In a global market, being able to switch between measurement systems is key. While we primarily use inches for tailoring here in the UK, many international clients and patterns work in centimetres. A simple conversion error can have a huge impact on the final fit.
The way we measure for suits in the UK has become much more sophisticated, informed by large-scale studies like SizeUK. This project collected over 140 body measurements from each person using both manual tapes and 3D scanners. This data helps tailors improve accuracy, especially since over 60% of UK shoppers find it hard to get clothes that fit well. It's all about moving sizing standards beyond what a simple tape measure can tell us.
Quick Inches to Centimetres Conversion Chart
Here’s a handy little chart to help you switch between the two most common units. It’s always good practice to double-check your conversions.
| Inches (in) | Centimetres (cm) |
|---|---|
| 15 in | 38.1 cm |
| 20 in | 50.8 cm |
| 30 in | 76.2 cm |
| 35 in | 88.9 cm |
| 40 in | 101.6 cm |
| 45 in | 114.3 cm |
Always double-check your final numbers before you proceed. A single mistake might seem trivial, but even a half-inch error can be the difference between a perfect fit and one that needs serious work.
If you find that your measurements still lead to an ill-fitting off-the-rack suit, it’s well worth exploring what local alteration tailoring services can do. By steering clear of these common mistakes, you’ll ensure your measurements are a true and accurate reflection of your build, paving the way for a perfectly fitting suit.
When to Trust a Professional Tailor
Knowing your own measurements is a fantastic skill to have. It empowers you, helps you make smarter off-the-rack purchases, and gives you a real feel for what a good fit actually means. But there are moments when the experienced hands and discerning eye of a professional tailor are not just a luxury, but an absolute necessity.
A tape measure can give you the numbers, but a true tailor knows how to read between the lines.
Think about those big life events—your wedding day, a major promotion, a black-tie gala. These are the occasions where ‘good enough’ simply won’t cut it. A perfect fit is non-negotiable, and even the most careful self-measurement might miss the subtle nuances a tailor sees instantly. A professional fitting goes far beyond simple dimensions; it’s about understanding your posture, your balance, and exactly how a particular cloth should drape over your unique form.
When Professional Guidance is Essential
If you find yourself constantly battling with ready-to-wear clothing, a professional consultation can be a game-changer. Perhaps you have broad shoulders and a slim waist, or one shoulder sits slightly lower than the other. Maybe you have an athletic build that standard suit patterns just can't accommodate. These are precisely the scenarios where a tailor’s expertise makes all the difference.
They spot these asymmetries and craft a garment that brings a sense of balance and proportion to your silhouette. This is the fundamental difference you’ll discover when you start looking into options like made-to-measure vs bespoke tailoring, where that professional interpretation is everything.
You should seriously consider booking a fitting if:
- You're getting ready for a milestone event like a wedding.
- Off-the-rack suits feel like they were made for someone else.
- You're after a garment with a truly personalised and impeccable fit.
At Dandylion Style, our process, whether you visit us in-studio or connect with us remotely, is all about translating your measurements into a suit that feels like a second skin. We see the numbers as the starting point, not the final word.
Ultimately, while measuring yourself is empowering, trusting a professional is what elevates the final result from good to truly exceptional. When you’re ready for that next level of precision and personal service, we’re here to guide you every step of the way.
About the Author
Igor is the founder and master tailor behind Dandylion Style, a gentlemen's tailoring house born from a deep passion for the art of the perfectly fitted garment. He believes a suit is more than clothing; it is a statement of personal style, confidence, and an appreciation for meticulous detail. This philosophy is at the heart of every commission, blending time-honoured British craftsmanship with a modern, sophisticated eye for silhouette and fit to create suits that feel as incredible as they look.
Frequently Asked Questions
Can I just use my usual trouser size for a suit?
No, it's highly recommended to take a fresh measurement. Off-the-rack trouser sizes often use "vanity sizing," meaning they are labelled smaller than their actual dimensions. Suit trousers also sit at your natural waist, which is higher than where most casual trousers or jeans rest. For an accurate fit that ensures comfort and a proper drape, always measure your true waistline with a soft tape measure instead of relying on a size you see on a label.
What if my body measurements don't fit a standard suit size?
This is completely normal and is precisely why bespoke and made-to-measure services exist. Very few people perfectly match the generic proportions of a standard sizing chart. You might have broader shoulders and a slimmer waist, or one arm might be slightly longer than the other. A professional tailor uses your exact, unique measurements to craft a suit that is perfectly balanced for your specific physique, ensuring a fit that is both flattering and exceptionally comfortable.
How much 'wiggle room' should I leave when measuring?
The tape measure should be snug against your body but never tight enough to dig in. A good rule of thumb for circumference measurements like the chest and waist is to ensure you can comfortably slide one finger between the tape and your body. This captures your natural dimensions without adding unnecessary bulk or measuring so tightly that the final garment feels restrictive. The goal is accuracy, not achieving a smaller number, so stand relaxed and don't pull the tape too tight.
Should I measure myself alone or ask someone for help?
While you can manage some measurements like your waist on your own, it is nearly impossible to accurately measure your shoulders, back, or sleeve length by yourself. We strongly recommend asking a partner or a friend to assist you. They can ensure the tape remains level and correctly positioned, especially across your back. This simple step significantly reduces the margin for error and is one of the most crucial actions you can take to get a reliable set of measurements.
How do I find my natural waist for trouser measurements?
Finding your natural waist is easier than you think. It’s the narrowest part of your torso, located above your belly button and below your rib cage. To find the exact spot, stand up straight and bend to one side; the crease that forms is your natural waistline. This is the correct point to measure for suit trousers, as it allows them to drape correctly and provides a much more comfortable and elegant fit than trousers that sit lower on the hips.
At Dandylion Style, we take those precise measurements and turn them into a garment that fits you like no other. When you’re ready for a suit crafted just for you, book your personal consultation with us.
Article created using Outrank